Importing and Exporting Contacts
The contacts import and export feature in Tourwriter lets you add your contact information to a grid formatted workspace and import/export contact data to/from Tourwriter. To import contacts, you need to populate data in the Import CSV (Comma Separated Value) file template. Exporting existing Tourwriter contacts lets you download your contacts into a CSV file.
Importing contacts
Contacts for each contact type are imported through separate import templates, as the included fields vary slightly between the types.. This means there are separate contact import templates for travellers, agents and suppliers. See CRM functionality for details. Let’s look at the steps to import contacts in Tourwriter:
- Access the contacts library by selecting Contacts in the navigation bar.
- From the Import/Export dropdown menu select one of three contact types to import:
- Travellers
- Agents
- Suppliers
- Selecting the contact type to import opens up a window with a download link to the template and a checkbox confirming you possess the contact’s consent to store their information.
- Download the template if you haven’t already done so.
- Open the template on your computer and populate the data.
Note: The columns in each template correlate to the fields for that contact type in Tourwriter. Therefore, you will find extra columns in the travellers CSV template, which corresponds to the additional contact information area on the traveller contact page. Note that the import will only work with the columns remaining in that order, you will not be able to add additional comments.
- After adding data to the template, save it by naming it differently from the template name.
Note: Not all columns need to be filled. Most columns in the import template can be left blank, however the First name and Last name fields are mandatory.
- Once you are ready to upload the template, select the consent checkbox to enable the Select file button.
- Click Select file to upload the file with the contact information.
Note: Data added to the import template should be of the same format as the example data present in the template. If the data does not match the format, an Import unsuccessful message followed by the error information displays at the top. See the Import rules section below for more.
- Wait for the upload to finish; you will see the upload progress on your screen. The imported templates will be sorted alphabetically by first name.
Import rules:
- The data import function allows duplicate records to be imported. Maximum contacts that can be imported at a time are 100.
- If an import fails, none of the data will have been added to the system. This operates at an ‘’all fail’’ or ‘’all success’’ concept.
- Enter dates in the Date of birth and Passport Expiry date columns in the YYYY-MM-DD format. For example, enter 2022-08-28 to represent 28 August 2022.
- The Gender column mandates values in lowercase and should only be either of the four values:
- male
- female
- non-binary
- prefer_not_to_say
- For the Source column in the import file, enter a value from a predefined list of contact sources in lowercase. Multiple word sources should be separated by underscores instead of spaces (i.e. “email_newsletters”):
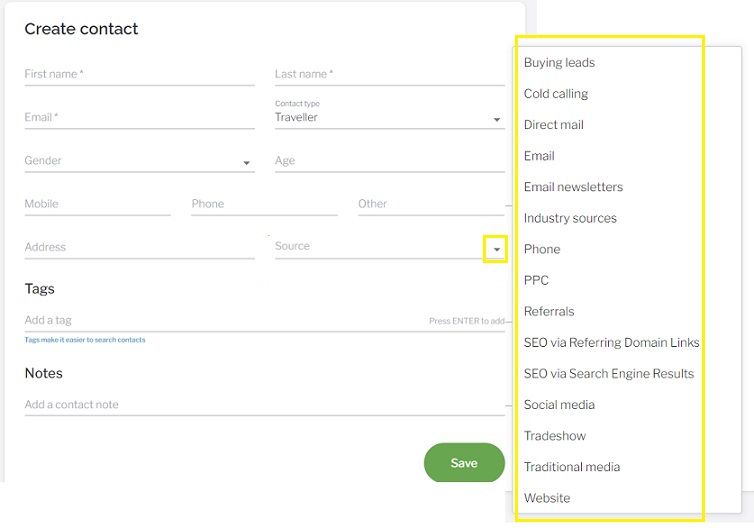
Note: Even though the highlighted sources are in sentence case, use lowercase when adding them in the import CSV file. Any sources containing more than one word should be separated by an underscore instead of a space. For example the source SEO via Search Engine Results should be entered as “seo_via_search_engine_results “.
- The Passport country of origin and the Languages spoken fields require the country/language code to be inputted. Therefore, enter “GBR” in place of Great Britain as the country. And “eng” in place of English or “fra” in place of French. View country code and language code to access the complete list.
Exporting contacts
Your Tourwriter contacts are available to be exported as a CSV file. Similar to importing contacts by contact type, contacts can only be exported for each contact type separately. To export contacts from Tourwriter:
- Access the contacts library.
- Select the Import/Export dropdown menu and choose to export one of the three:
- All travellers
- All agents
- All suppliers
- Once contacts from each type are gathered, the loaded data is available to be downloaded to your device as a CSV file.
Note: The downloadable file name appears with the same naming convention as the export option. You may add a “_Tourwriter” suffix to denote that data is from Tourwriter.
Exporting rules
- Due to the differences in fields for each contact type, you cannot export all your contact in one file. The export functionality only lets you bifurcate your export per contact type. To export all your contacts, export each contact type separately (three times).
- Blank fields in an export sheet suggests that the corresponding contacts library fields in Tourwriter are blank.
- The exported values for the Passport country of origin and the Languages spoken fields are country/language code. For example, GBR for Great Britain, en for English and fr French. View country code and language code to access the complete list.
- Your contact information displays in separate columns. The columns in each template correlate to the fields for that contact type. You may tweak the values in the CSV file to match a particular format. Many spreadsheets require the format for dates to match that of your locale. For example, the format DD-MM-YYYY displays the date as 04-02-2022.
Note: The exported CSV contacts are useful to upload to an email-marketing platform, such as Mailchimp.
 Previous Post
 Next Post


