CRM Functionality in Tourwriter
Tourwriter Plus, Tourwriter One and Tourwriter Plus Integrated plans come with a built-in CRM which allows you to store information about your travellers, suppliers and agent contacts.
This help article guides you through the steps to create a contact record and walks you through adding existing traveller contacts to an itinerary.
Creating a contact record
A contact record lets you store the relevant information about a business contact (i.e. traveller, supplier or agent) and associate it with different sections in Tourwriter. To create a contact record:
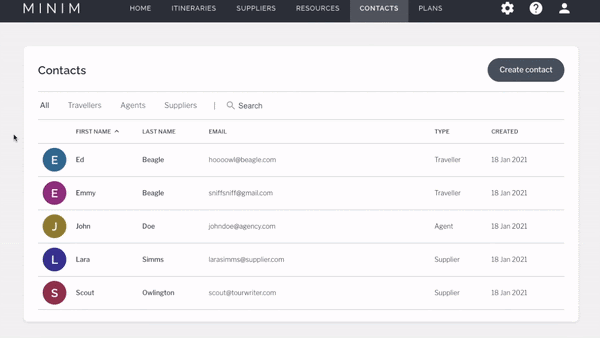
- Access the contacts library section by selecting Contacts in the navigation bar. If you have never used this feature before you will not see any records initially, however, the library is where you will see a list of your current contact records.
- Click on the Create contact button on the top-right corner to open the Create contact page.

- Populate the mandatory fields that are First name, Last name and Email.
- You can choose one of the three contact types: Traveller, Agent, Supplier.
- Enter other contact details such as Gender, Age, Mobile, Phone, Other, Address and Source. There is a predefined list of contact sources to select from.
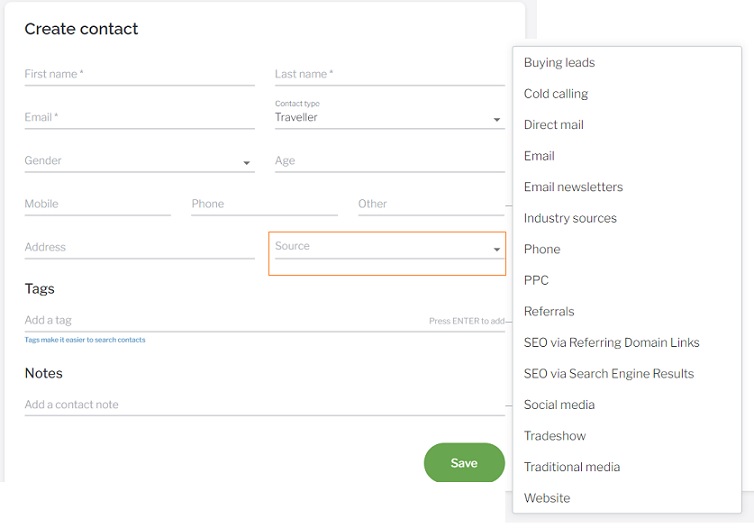
- You can associate an unlimited number of “tags” with a contact record in the Tags section. Add a generic tag to the contact record to associate it with terms that you repeatedly use. For example, use tags such as Luxury, Budget or Family to indicate the traveller type. You will be able to use this information to search your contact database at a later date.
Note: A contact record can have multiple tags. You can even include multi-word tags.
- Include any relevant notes about the contact. For instance, you could make a note of a traveller’s interest in nature tours.
Note: The phone fields and the First name, Last name and Address fields restrict entry to 255 characters. - Before a contact can be saved to your library, you will be prompted to confirm that you have a contractual basis, consent or another legitimate interest to store this information. This requirement is in accordance with the most comprehensive data privacy laws and is designed to help protect your business.
Adding a traveller contact to an itinerary
You can add an existing traveller contact record from your library to an itinerary. Follow the steps below to add a contact record to an itinerary:
- Access the itineraries list view by selecting Itineraries from the primary navigation bar in Tourwriter.
- Select an itinerary you wish to add the contact record to or create one from scratch.
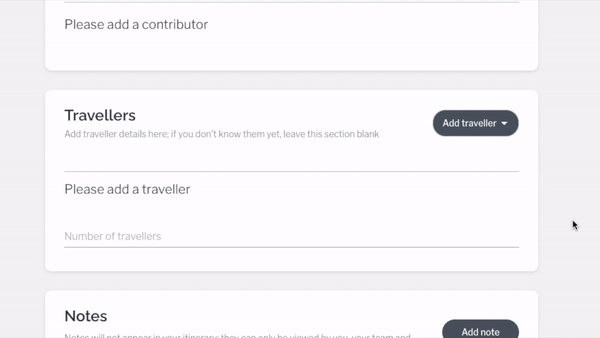
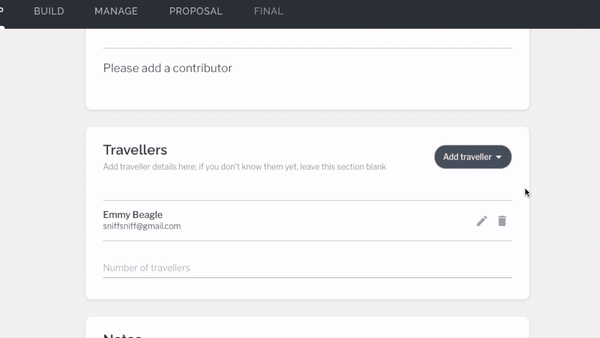
- When you finish creating an itinerary and access the Setup page, scroll to the Travellers section to add a traveller.
- Click the Add traveller dropdown in the top-right corner and choose either Add existing contact (to select an existing contact already in your contact library) or Create new (to add a new traveller that does not yet exist in your contact library).
Add an existing contact
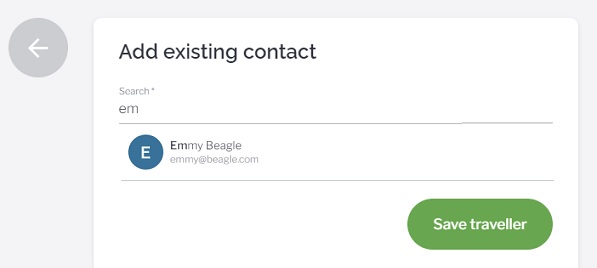
The Add existing contact option lets you add a traveller contact record from the contacts library to the itinerary. To open a contact record:
- Head to Add traveller > Add existing contacts option to open a new page.
- Search an existing library contact by entering either their first name or last name. Ensure the contact type is Traveller.
- Begin typing the name of your contact and select the desired record when it appears. If nothing appears, the name you have searched for does not currently exist in your contact library.
- Select Save traveller to add them to the traveller list in the itinerary.
Create a new traveller
In addition to creating a contact record through the contacts library, you could create a record within an itinerary. To do that:
- Head to the Add traveller > Create new option to open the Add traveller page.
- Tourwriter only lets you fill in the mandatory fields while creating a contact record within the itinerary. Enter the First name, Last name and Email.
- Toggle the Save to contacts library switch to save the contact record to the contacts library.
- Select Save traveller to finalise your changes.
Editing a contact
You can edit an existing contact record within the contacts library or the itinerary.
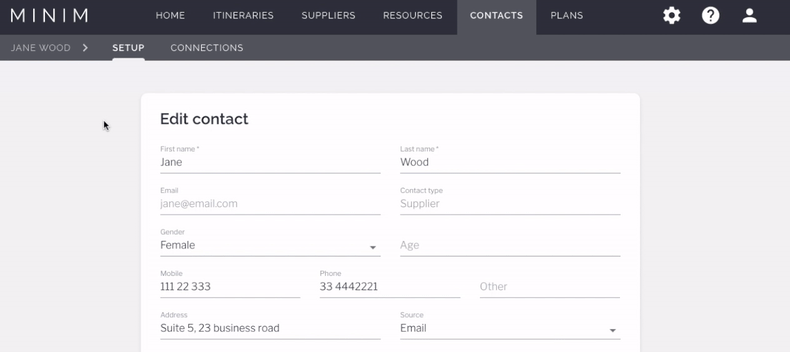
Edit a contact in the library
Editing a contact added to your itinerary, takes you to the contacts library if the contact is saved to your library. Else, you can edit the contact name if the contact is not saved to the library:
- Navigate to the contacts library by clicking Contacts in the navigation bar.
- Select the contact you wish to edit. This opens the Edit contact page.
- Make the changes required and click Save.
Note: Once you create a contact record, Email is the only field shown in a different font as it is un-editable.
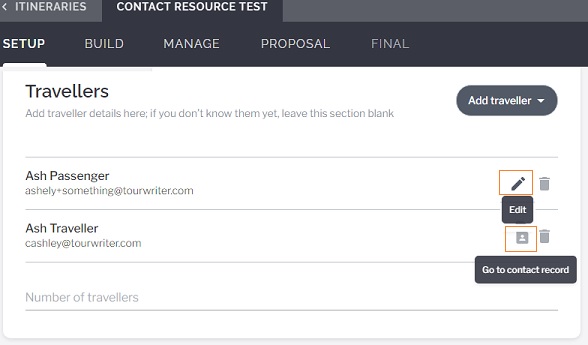
Edit a contact on the itinerary
When editing the contact on the itinerary, you see the edit icon if the contact is not saved to the contacts library.
- Click the edit icon to access the contact to edit the First name and the Last name.
Note: The email field is not editable. To change the email, delete the existing contact and create a new one.
- If you see a contact book icon against the contact, the contact is editable only through the contacts library. Click the contact book icon to edit the contact in the contacts library, as explained in the Edit the contact in the library section.
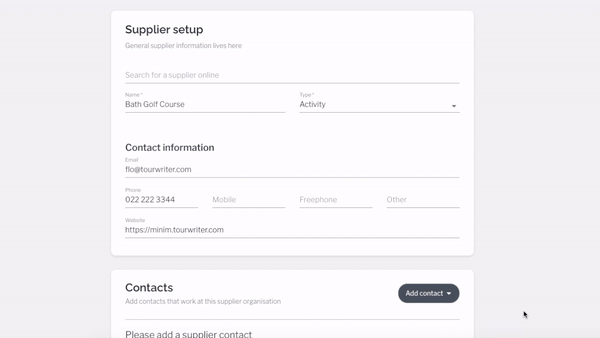
Adding a contact to a supplier
To add a supplier contact record to their associated company in your Tourwriter supplier database, follow the steps below:
- Select a supplier from the suppliers list and scroll to the Contacts section at the bottom of the Setup tab.
- Click the Add contact dropdown to the right and choose either Add existing contact (to select an existing contact already in your contact library) or Create new (to create a new contact that does not yet exist in your contact library).
Add an existing contact
The Add existing contact option lets you connect a supplier contact record from the contacts library to your supplier. To add an existing contact record:
- Click the Add contact button and select the Add existing contact option
- Search for an existing library contact in your library by entering either their first name or last name. (Only contacts with the type ‘supplier’ will appear)
- Select the desired contact record as it appears when you type
Note: If nothing appears, either the name searched does not exist in your contact library, or the contact record is already added to another supplier. A contact can only be connected to one supplier organisation.
- Select Add contact to add them to the contacts list in your supplier.
Create a new supplier contact
In addition to creating a contact record through the contacts library, you can also create a new contact record from directly within a supplier.
- Click the Add contacts button and select the Create new option
- Enter the First name, Last name and Email of the supplier contact record you wish to create.
- Select Add contact to add the contact to the supplier. The contact is auto-saved to the contacts library during this process.
![]()
Note: When in the supplier setup page, you may edit a supplier contact by clicking the contact icon displayed alongside the contact. Doing so takes you to the contacts library.
Additional Contact Information
The additional contact information fields differ for each contact type. That’s because information recorded for, say a traveller, is different to that of a supplier contact.
Traveller additional details
The additional contact information area is where you can enrich your traveller contact records and include:
Passport details: This section includes fields where you can enter traveller’s passport details, such as their full name on passport, passport number, visa specifics, vaccination details and so on.
Insurance details: Record the traveller’s insurance details in this section. The fields included in this section are:
- Travel insurance provider
- Policy number
- Insurance notes
Emergency contact: This is an area to enter the traveller’s emergency contact details. The fields available are:
- Full name
- Relationship with traveller
- Phone
Licence details: The traveller’s driver’s licence details can be recorded in the fields in this section.
Physical details: You can record a traveller’s physical attributes, such as their Height, Weight to cater to their health care needs. Fields such as Fitness level, Cycling ability, Swimming ability, Health and mobility level gauge the difficulty levels of activities the travellers will partake in.
Languages spoken: This is a field that auto-suggests results based on your keyboard input. The languages chosen are shown as a tag since a traveller may speak more than one language. The language choice is restricted to the options listed.
Special requirements: The fields record the following information about a traveller:
- Allergies
- Dietary requirements
- Religious or cultural requirements
- Special assistance needed
Social media: This section records the traveller’s social media profiles, such as Facebook, Instagram, WeChat, LinkedIn and Other.
Note: All the open text fields have a limit of 255 characters.
Supplier contact additional details
The additional contact information area for a supplier contact includes:
- Staff details: This section lets you add the staff’s Job title.
- Languages spoken: This is a field that auto-suggests results based on your keyboard input. There is no limit to the number of languages you can select here. The list of languages to select from is comprehensive, but not exhaustive – if you feel we have missed an important language let us know.
- Licence details: The suppliers driver’s licence details can be recorded in the fields in this section.
- Miscellaneous: You can record the contact’s Health and safety information and Clothing size in this section.
Contact connections
The details of the itineraries or supplier linked to a contact is available in the Connections tab.
Traveller connections
To view the itineraries a traveller contact record is associated with:
- Open the contact in the contacts library. Contacts > Setup tab is the page that appears.
- Switch to the Connections tab to see a list of itineraries the contact is added to.
Supplier connections
To view the supplier a contact is added to:
- Open the contact in the contacts library. Contacts > Setup is your default view.
- Switch to the Connections tab to see the supplier the contact is added to.
Note: As a contact can be added to only one supplier, you will only see one supplier in the Connections tab.
Importing and exporting contacts
You can import contacts in Tourwriter by downloading the import CSV templates for each contact type. You can also export the contacts in your library to a CSV file. CSV presents your contacts in a tabular, text-only format. To learn more, read Importing and exporting contacts.
Archiving and restoring a contact
The archive and restore function for a contact lets you archive a contact and restore the archived contact at any point in time.
Archiving a contact
To archive a contact:
- Access the contacts library section by selecting Contacts in the navigation bar.
- Select the Options menu (three dots) at the end of a contact row you wish to archive and choose Archive from the dropdown list.
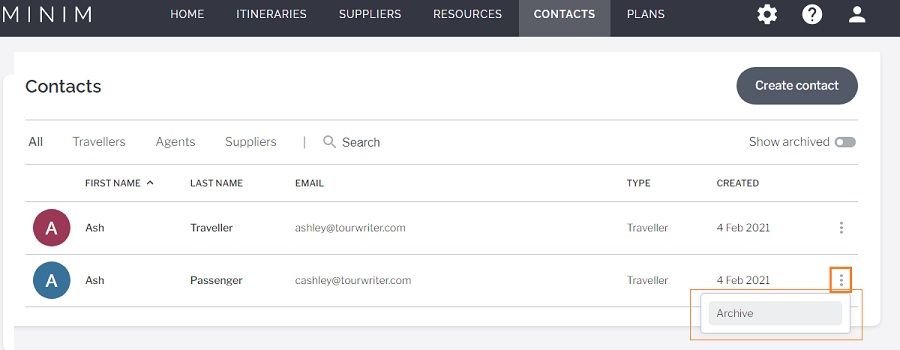
Note: Archiving the contact record removes it from the library view. Restore the contact to add it in the contact library list again.
- Select the Show archived option to access the archived contacts view.
Restoring a contact
Restore archived contacts through the Archived contacts view. To restore archived itineraries:
- Head to the Archived contacts view by selecting Show archived.
- Click the Options menu (three dots) at the end of the contact row and choose Restore from the dropdown list.
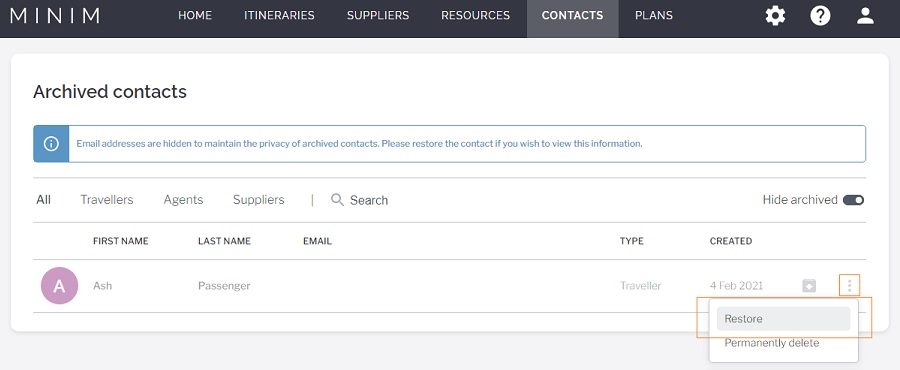
The contact will be available in the contacts library again.
Deleting a contact record
You can permanently delete a contact in Tourwriter only after archiving it. To request permanent deletion of a contact:
- Access the ‘archived contacts’ view by toggling the show archived slider.
- In the ‘options’ menu (three vertical dots) at the end of a contact row, select Permanently delete from the dropdown list.
Note: A warning pops up stating that the contact will be permanently deleted within 31 days. The warning also lists itineraries that the contact is currently connected to.
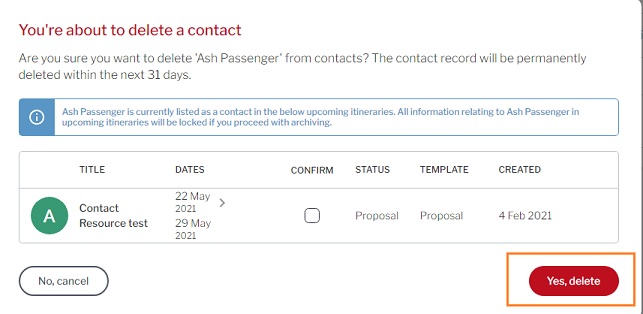
- Select Yes, delete to permanently delete the contact.
Note: The itinerary will still display the deleted or archived contact that it was a part of, but is inaccessible. When you hover over the contact in the itinerary, a “Contact has been archived” message is shown.
 Previous Post
 Next Post


